Showing posts with label Graphite. Show all posts

Friday, June 3, 2016

Painted Armoire: Furniture Makeover


In all honesty, there are projects I bring home that I just don't want to work on. Not necessarily because they will be too difficult, but because they are just so big and ugly and I even question whether or not they can possibly be lovable again.

Case in point, this Stanley armoire that I've been sitting on or about a year.
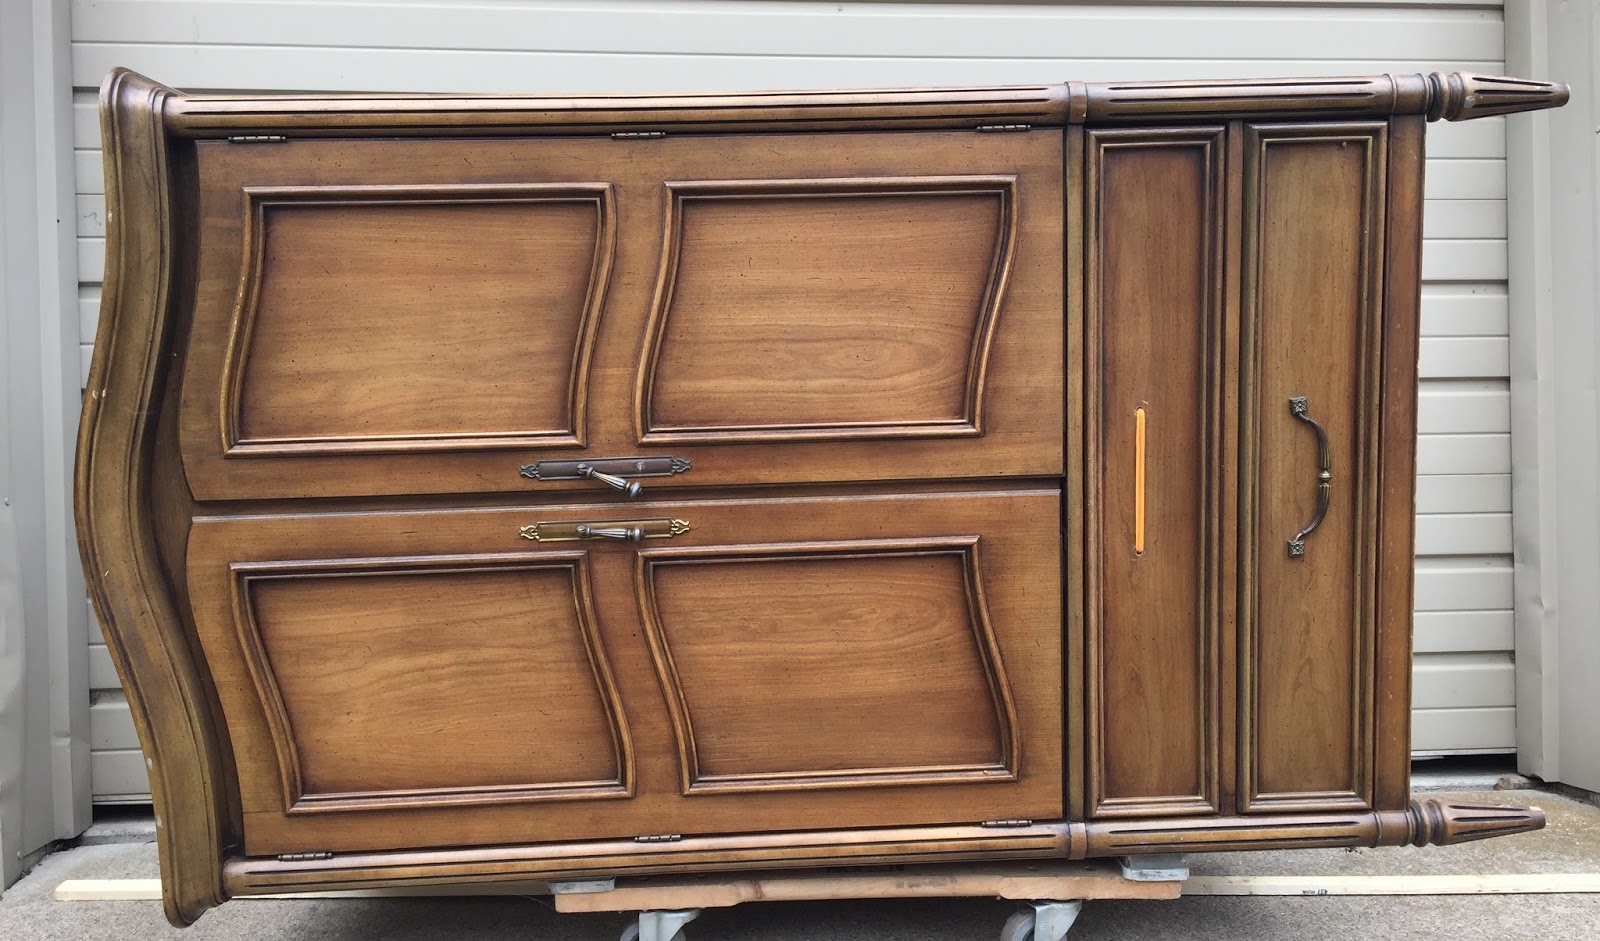


It was in great shape, but a drawer pull was missing and somewhere along the line the previous owner used it as a TV stand so they had cut the back out. Neither of which were deal breakers, I just didn't have the energy or desire to work on it. I actually tried to sell it on craigslist for a couple weeks but  everyone kept asking for better images before they would come see it and it was so big and heavy that I couldn't stand it up by myself for decent photos ... so, I caved and just decided to push it in the shop and give it a makeover myself. {and now, this is probably one of my all time favorite makeovers, go figure!}

I painted the piece in a custom chalk paint mix and gave it a antiqued finish. The hardware was updated too. I purchased new knobs and then added some small backplates to them that I had in my stash.


I went back and forth on whether or not to paint the inside of the piece, but ultimately decided against it because the wood was in such great shape.

I hope you like this big makeover as much as I do!

Have a great weekend.
~Crystal

Wednesday, March 2, 2016

American Empire Dresser

Ok! I don't know how to fully articulate how happy yours truly was when I picked up this dresser. I was ecstatic! No beyond ecstatic...I was crazed. I have been lusting for an American Empire dresser for what seems like a hundred years. I was in complete shock that I had found one and even more shocked when I was lucky enough to get to bring it home and add it to my decor.

You know that feeling when you have something that has been on your want list for a LONG LONG time and you finally get to make that want a reality...that is how I felt about this dresser. I know most people wish for more important things and you probably think that I'm half nuts for having a dresser on my list...but that is how I roll. Call me crazy, you're probably right!

---------------------------

This guy was in fair condition considering it's about 200 years old. As usual, the drawers definitely needed some repairs and somewhere along the line someone had done a poor job of trying to refinish it so there was shoddy work that I needed to make right. 


I'm pretty sure the wood on the drawers is curly maple and it was jaw dropping gorgeous. To let the wood shine, I just took the old finish back to the natural wood and sealed the drawers and the knobs with ASCP dark wax. The finish is smooth like butter on these babies now.


I painted the body structure in ASCP Graphite and sealed it with wax too.


That wood on the drawers and those chunky legs are so lovely. {heart throb}


I thought about replacing the knobs with something more splashy but I think the large wooden knobs look great and don't distract from the natural beauty.


Now I can check this style dresser off my want list...except I would love to get my hands on another...I sense a problem!

I'm starting on some really outrageous spring projects...some new ideas and bringing back some favorites from last year. I'll be posting new things in the upcoming weeks as well as information on my spring and summer show schedule.

I thank you for stopping by the UP blog today and checking out my latest project. Take care!
Crystal

Wednesday, January 13, 2016

Mocha Dresser Set {Custom ASCP Color Mix}


I've been meaning to try and create a nice rich chocolate brown concoction for sometime now. So when I found this really nice dresser set, with the clean lines that I really wanted, I thought it would be the perfect subject to get to work on!

The inspiration for the color comes from all the dark antique coffee {driftwood-esque} styles that I see at some of the big retailers these days.

The awesome thing about Annie Sloan Chalk Paint is that it mixes really well together, enabling you to create an entirely new pallet of colors. I landed on a mix of Olive, Primer Red and Graphite. {here is the mix ratio}


As usually, I removed the hardware and got to work. I painted the base with the custom mocha color, then I waxed it with straight dark wax, immediately followed by a wash of Coco. After wiping back the Coco, I let both pieces dry overnight. {this is what it looked like at this point}


The next morning, I sanded it back just a bit to expose more of the darker undercoat. Then I proceeded to give it another coat of dark wax. {here it is at this point}


The final step was to find some great new hardware to bring the piece up to date with it's new look. This step can be the most painstaking because I argue with myself about what direction to go. After a bit of searching, I finally decided that some antique brass cup pulls.I think they look fantastic and complete the look I was after!


That's all for today!

Stay warm.

Sunday, December 27, 2015

Debonaire Dresser {Twelve Drawer}


It's been weeks since I have had the opportunity to get into the shop and transform some furniture. So I decided to go BIG...and by big I mean this twelve drawer Empire brand dresser!


Let's be honest, this guy was a beauty from the get go: solid wood, dove tail construction and drawers that glide like new. Really the only problem was the visible signs of wear on the surface.


I got busy removing the hardware and stripping down the top. While I was messing with all that I was contemplating the color for the body. I love a two tone mix of stain and paint on pieces, so I decided to go dark grey and a rich warm brown stain. 

For the body, I mixed a custom color of Annie Sloan Chalk Paint, Graphite and Coco. {finished with a mix of dark and clear wax} And for the stain on the top I mixed up another custom concoction...dark walnut and natural oak. 


Part of my process is that I go through each and every drawer, cleaning, repairing {if needed} and sanitizing them thoroughly. For you, that means peace of mind to know they are clean before the new owner uses them.

As part of our thorough makeover process, we also paint all sides of the piece. You can rest assured, that in the event you want to position the piece in a way that the back is exposed ... it's finished and looks as lovely as the front. 


This guy would be perfect to store all your winter sweaters.
It would double nicely as a changing table in your newborn's room.
It would even look amazing in your dining room to store all your linens and grandma's silverware!

No matter where you can envision this handsome devil, it's ready for the task!

Here are some more shots to flip through...


It sure felt good to makeover this guy, I didn't realize how much I missed the brush these past few months.

Thanks for swinging by and looking today!
~ Crystal

Linking up:

Thursday, September 17, 2015

Midweek Makeover: Mid Century Buffet

 Who can deny that we tend to gravitate to comfortable situations and familiar territories. It's so much easier in every way when you know what to expect. I know that is certainly the case for me most of the time. However, on occasion, I force myself to try something that is not in my wheelhouse...this Mid Century buffet was one of those projects.


It's really hard to articulate the frustrations that went into this project. Simply looking at the before and after pictures, you're probably thinking 'she's just being overly dramatic'...'how could this project have been that tough!' I should have captured some 'in progress pictures' so you could thoroughly enjoy the chaos!

But since I don't have detailed pictures to share, imagine if you can, two solid weeks of:

Paint a little bit
{notice poor paint coverage issues}
Stand back and critique
Apply a clear coat to seal the entire piece in hopes of better paint coverage
Paint some more
Critique some more
More coverage issues
{vow that I'm never taking on another mid century piece AS LONG AS I LIVE}
Contemplate throwing the buffet in the fire pit
{no that's wasteful, I'll put it out at the curb for some eager passerby}
Apply more sealer
Resolve to leave it sit for another day and assess the mess in the morning
Repeat

This went on for TWO, LONG, FRUSTRATING weeks. I thought I would never get this nightmare out of the shop!

'How could one piece be so finicky and temperamental', I would mumble as I stomped through the shop. {I may have used some graphic language too, but I'll spare you those details}

And then it happened...I began to see the progress unfolding and I was actually starting to like what I was witnessing before my eyes. Who knew it was possible!


I can honestly say that I'm happy I stuck with this project and finished it up because it's quite the looker now!

~Crystal

Saturday, September 5, 2015

One Nightstand {Nope, Two!}

My husband brought home this antique vanity for me earlier this spring. Seriously, how lucky am I! Some women get excited when their man brings them flowers...not me, I get all silly over a junky piece of furniture. To each their own I guess:)


This vanity is a different style then I'm use to making over, but it's good for me to work on pieces that are outside my comfort zone. {I just kept telling myself that as I stared at this piece in the garage for THE ENTIRE SUMMER!}

Finally a couple weeks ago, as we were embarking on Operation: Park in the Garage Again, I forced myself to tackle this makeover.

What's not apparent from the before picture is the abundant veneer issues and the broken mirror. After chewing on this girl for a few months, I decided to deconstruct it into two compact and functional nightstands.

After applying loads of wood filler, sanding and then more wood filller...somehow these little gems came to life. I used my favorite ASCP in Graphite and some new cream colored ceramic knobs to update the pair and make them uber cute once again.

Here's the before and after as well as a bunch of closeups for your viewing pleasure.


 As always, thanks for stopping by and checking out my latest makeover. Hope you are enjoying a beautiful Labor Day weekend!

~Crystal

This week's link ups include:
Finding Silver Pennies
 Vintage Inspiration Party

Sunday, August 9, 2015

Driftwood Cedar Chest

When I started the makeover on this project I had a vision to create a warm driftwood look with layers of texture and depth. 


That was the vision...but actually getting there was more challenging than I thought. I went through every stage of the creative process...

image credit, www.bloglovin.com

It's a funny graphic, but sadly, it's all too true for most of my projects! Ha!

Anyhow, back to the Cedar Chest, here is how I accomplished the driftwood look:

First I gave the entire piece a real rough coat of ASCP Country Grey. By rough I mean not thorough and in a real whimsical fashion, imagine brush strokes in all different directions.

When that was dry, I waxed the entire piece with ASCP Dark Wax.

Then I washed the entire piece with ASCP Graphite and wiped the wash back leaving just a hint of the graphite.

I sanded a few spots, areas that would typically show wear and tear.

Finally, I waxed the entire piece again with dark wax and gave it a nice buffing to make the finish shine.

I went back and forth on whether or not I should paint the cute feet, but ultimately decided that leaving them natural and giving them a quick coat of dark wax to freshen them up would highlight them the best.


I'm smitten by the layers and texture that I achieved on this cedar chest. I guess the morale here is to keep pressing on when you have a vision and hopefully it all turns out just like you had hoped!

Thanks for stopping by!

Have a great week,
~Crystal

Sunday, May 3, 2015

Antique Industrial Chest of Drawers + Dresser Set

 This is a project that I've been wanting to try for quite sometime but I just needed to find the right specimen. Well low and behold, my hubby found this set for me and hauled it home a couple weeks ago-GAME ON!

This set was in awful shape, but it was exactly what I needed for this project so into the shop for a TON of prep work. We had to repair years of damage, literally rebuild a few drawers and replace all the drawer bottoms. Here are a few pics of the progress...


I had picked up an outrageously cool printers cabinet several months ago and have been obsessing with the finish...this would serve as my inspiration piece...


I love the patina on this cabinet from the years of use...now for me to apply that same feel to my dresser set.

 To get this look, I washed both dressers with Graphite, wiping back the wash as needed to get the desired finish. Using dark wax I was able to achieve the depth I needed and highlight the oak wood grain as well. To complete the look I picked up some 'new' industrial inspired pewter knobs and drawer pulls.


Antique Industrial---that's what I'm calling this style. 

Thanks for stopping by and taking a look.
 Have a great day!